Showing posts with label jewelry making. Show all posts

Friday, December 2, 2011

Inventory FAIL

 Okay, here's why I don't do inventory. See, back 4 years ago when I started getting into jewelry making (again), I bought all sorts of beads. I am good with keeping receipts, and making sure that I don't spend more than I make (usually - oops). But I never did a real, physical inventory. I know how much I mark things up, so I generally know how much stock I should have. But I never counted the beads and supplies that I bought as I went along, nor did I subtract the beads and supplies I used as I went along.
Then I got a new spreadsheet software program.
It requires that I start with a complete inventory.
Ugh.
So, for the last four days, my ADHD brain and I have been having little battles all over my office (which, incidentally, is still pretty messy since my last office posting in July, I know. Bad!). You see, one of the main reasons I don't do inventory is that, with ADHD, I get distracted.
Really distracted.
Any noise, bird flying past my window or dog fart (all too depressingly common) will stop me in my tracks. I get distracted by email and general useful and useless internet searching (such as, "best bead storage systems", or, "How can I count inventory without actually counting it?").
So far, I'm about a quarter of the way through and my inventory says that I have 177 different types of inventory (read: beads, findings, stringing wire, etc), and over 30, 056 items counted. Yes, I have actually counted over 30,000 individual things.
Mostly... I can weigh my seed beads, for example, to get pretty accurate counts (I am NOT counting 10,000-plus tiny beads that I can barely SEE, let alone keep in a neat little pile), but most of the time I'm actually counting the little bug - er - beads and things.
Most of the time.
Part of the challenge of doing inventory is that I have all of these nice, shiny, new beads (when they get put into a storage cabinet for a while, and then you pull them out again, they are like hidden treasures, being unearthed for the first time), and when I take them out, I can't help but notice how pretty, say, the moonstone beads look against the rhodonite beads. And how pretty they would be strung with a nice 14 karat gold toggle clasp and 14 karat gold finishing beads. Then my ADHD brain takes over and tells me that it really won't take that long to make one simple (albeit stunning, if I do say so myself!) necklace.
In the middle of doing inventory.
 Never mind that I haven't tallied my toggle clasp or gold beads. I just decided to skip a bunch of spaces that will hold beads in my spreadsheet, count and record the interminably small, frustrating gold beads (while starting to fidget and string the moonstone and rhodonite beads), count and record the clasp and nylon-covered steel beading wire (nothing but the best and strongest for you, my dears), and GET CREATING!!
What started out as an, "It won't take that long" project - you can see in the first photo the disaster of my desk and the starting of this new necklace on the bead board - turned into a couple of hours of bead-play time. I don't mind. The necklace was definitely worth it - it was so much fun to make, and turned out so well, that I think the time was well used (and besides, don't I deserve a little break for working like one of Santa's elves??)
This necklace, entitled Marie Antoinette Raspberry Ice Necklace, is the newest piece in my NeoAmour collection and is available in my Etsy shop here: http://www.etsy.com/shop/LittleStudioJewels?ref=si_shop
Please let me know what you think, I really value your opinions :)
Have a great day. Oh, and if you don't hear from me for a bit, could you please send a search party in to my office? It may be that I got lost in beads....

Thursday, February 11, 2010

Thoughtful Thursday: Sea Glass

~Image from North American Sea Glass Association~

I was perusing a few blogs (as always) and came across a post of an interesting article by the North American Sea Glass Association. Apparently there are some unscrupulous sellers of artificial sea glass and so the thoughtful people from the Association have come up with this incredibly informative page of information. As I've considered buying sea glass before (though I haven't yet), I'll be doubly careful who I buy from now! Please do check it out, even if you aren't a jewelry-maker, if you wear sea glass jewelry, you'll want to make sure it is the real thing to avoid potential exposure to chemicals: http://www.seaglassassociation.org/GenuineVsArtificial.php

Have a great day!

Saturday, December 5, 2009

Sweet Saturday: What a Great Week!

WHEW! What a week! I'm sorry I've been very absent this week, but it has been crazy busy...in a VERY good way! First I had a wonderful visit with a goldsmith friend and her mom on Monday where we talked jewelry and ate fresh baked goodies from my oven (vanilla cupcakes with chocolate fudge frosting). She lent me a bunch of books to read (see above).
Then Tuesday I had my last gluten free cooking class of the year - a GIANT gluten free baking exchange with over 15 people and 15 different recipes. It was a HUGE success and an absolute ton of fun!
Wednesday was recovery, but I baked some gluten free and dairy free sugar cookies, and Thursday I baked some gluten free gingersnaps and put up the tree. I am trying to get my baking done by the end of the weekend so that I can give my baking gift baskets out early this year.
Yesterday I had my good friend Louise from Fireseed over. We ate fresh baked shortbread and exchanged some goodies: I finally got to buy her little Viking Monkee, Thor (isn't he DARLING??), and then she gave me these beautiful blue beads to play with! Louise is currently making reproductions of ancient beads and is doing a tremendous job of it! These were inspired by a necklace from the 2nd cen. BC to the 4th cen AD. Isn't that cool? I have MANY ideas for these beads!
Last night I started on a new project - Viking Knit! This is done with VERY fine wire and is actually WAY easier than I had been led to believe. I am going to make this for my little Thor to rest on. If I am fortunate enough, I'll make a necklace of this to rest him on. Stay tuned and I'll keep you updated (promise!).

That's all for now, I did put up my tree, and I'll post that later on.
Have a great weekend!

Monday, November 30, 2009

Monday's Methods: The Office is Almost Done!

It's Here! It's Finally Here! I got my workbench on Friday and though it isn't exactly as advertised (and don't you worry, I am still good an annoyed at that), it is together and holding my jewelry making supplies. It was advertised as a "steel workbench" and the photo showed it with a stainless steel top, but when I got it, surprise, the item number was the same, but no stainless steel worktop! However, Brennan says we can get a sheet of steel and screw it down onto the top.
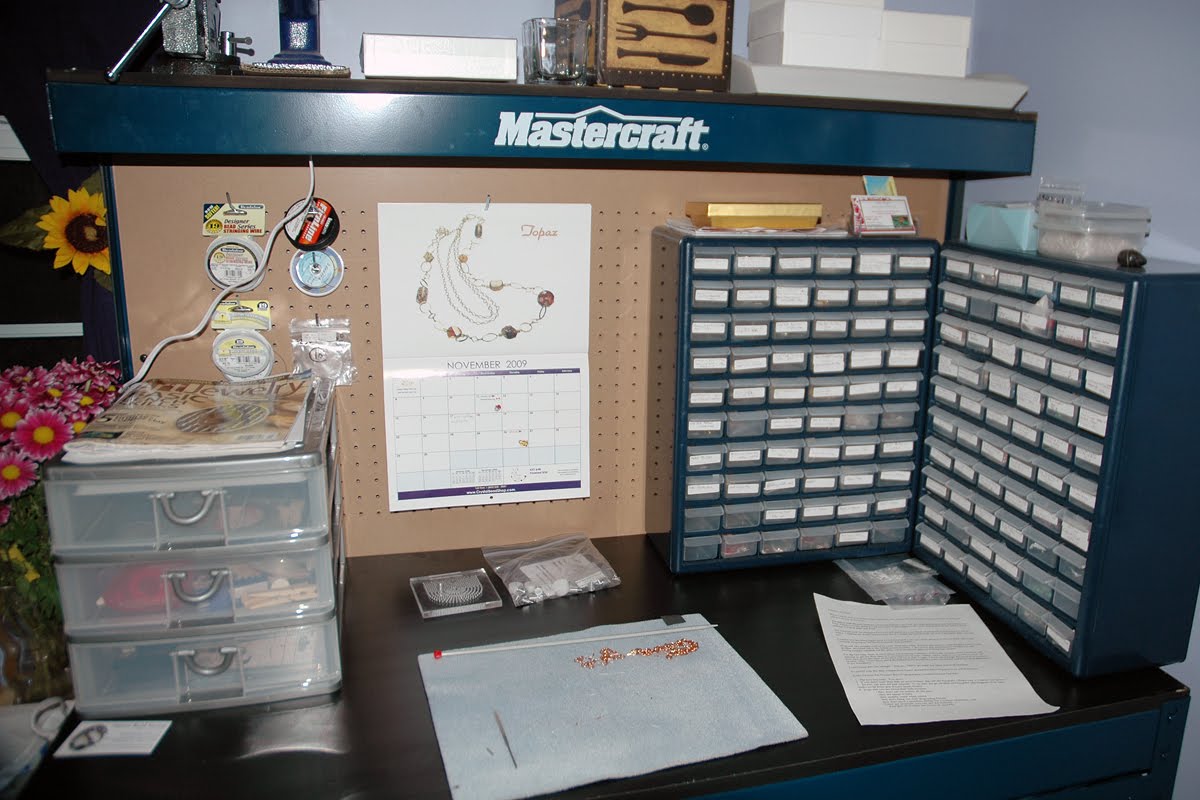
Here is the worktop with my supplies on it (you can barely see the anvil and vise on the top shelf). Even better: there is a light on the underside of the shelf so that I have my workspace lit up! There is even a power bar on one side so that I can plug things into it when I get my torch, kiln and other power tools up here. I still have to get the proper extension cord to plug the power bar into the wall, but that is not essential at this point.
Here are the two giant drawers that I managed to fit most of my regularly-used tools and supplies into. One side is for tools, the other for wire, stringing materials and so forth.
Here is the bottom shelf, where I have room for my polymer clay oven, paper shredder and empty storage boxes. When I get my last set of shelves, the empty boxes will go on them so that I have my feet free to rest on the shelf when I sit to work at the bench.
Here is my office now - I have my desk and workbench snug against each other so that I can work on one side and still see (and more importantly, reach) the other. Now I can work on jewelry and my laptop at the same time, Hallelujah!

Until tomorrow, we got our first dusting of snow this morning, I'm off to try and ignore it (with many a "Humbug!", lol).

Wednesday, November 18, 2009

That Was Fun...Part 3

Well here is the last installment of my office redo until I get my new workbench and last set of shelves. At that point I'll move our giant laser printer onto the shelves and transfer my jewelry making supplies to the new workbench, move my cork board above my reading area (see below), and then relax! Here are my shelves, totally organized! I was able to fit all of my jewelry books and magazines, business books, painting inspiration photos, frames, sewing machine, general office supplies and junk, board games and some of my favorite Etsy artists' artwork.
Here is my beautiful new desk! I got it from Ikea and it is fabulous! I was able to fit one of my filing cabinets right under the desk, with room for a storage box full of old computer stuff behind it (old hard drives, etc.). It is wide and deep enough to hold my laptop, stereo, water glass, to-do binder, scrap paper binder (I told you I'm into the 3 R's, lol), my pen pots (recycled from old tea-leaf cans covered in scrapbook paper), and my "freebie box" - all of my materials that go into making freebies for you when you order more than $10 from my shops. I like to keep it in front of me so that if I have a little extra time I can fill it by making gifties for you! Even better is that my desk is in front of my window so that I can see outside when it is light and be inspired by my forest. The desk is also over my heating vent, which has turned out to be quite handy in keeping my perennially cold toes nice and toasty!
Here is my temporary work desk. It is clean! I have my tools in the storage drawers to the left, with my vice and anvil in front. Then I have my 2 bead and finding storage drawer sets (they are overflowing, so the next time Canadian Tire has a sale on these "Parts Drawers", I'll be getting ANOTHER one, LOL! I also have room to work, which is great, as well as being able to store my various-sized plastic baggies (in the white boxes next to the bead storage) and my photography light is on top of a box to better light up my light box, which I now have room for! See the last photo for my new light box.
Here is what will be my reading corner. I have Arwen's bed so that we can be near each other, I have my tall bookshelves with some books, and many pieces of Etsy Artisans' art - from Epic Farms, Crazy Bliss, Art By Marilyn, Visual Smiles Gallery, Bunnies and Hares by Dragon House of Yuen (not pictured, but I now have them on my small bookshelf), and more! I'm going to put more of my books on the smaller shelf and eventually find a comfy armchair/reading chair to put right beside it that I can curl up in to read a good book for hours on end. I also had room for one of my yoga mats and light hand weights, so that I am able to get in a few good vinyasas or arm curls when waiting for things to load :)
Here is my fabulous light box! Constructed from a standard cardboard filing box, I lined it with plain white paper to bounce the light around in it. I have a white background for dark pieces, and for lighter pieces I have this grey background (it looks brown here, but that is from all of the different light sources hitting it in the photo). This allows me to have more even lighting and get more consistent photos of my jewelry. I finally have room for it, and room to store it when not in use, so I am very excited about this!

Well, that is all for now, I'll keep you updated on the new workbench and shelves as they become available. I'm also starting to (slowly) purchase metalsmithing equipment to expand my jewelry knowledge and techniques, so I will be sure to show you the new tools as I get them :)

For those interested, the heavy duty shelving units (Spacemaker Brand) are from Canadian Tire and cost $45.99 each. They are 36inches wide, 70inches tall and 16inches deep. The desk is from Ikea and is Mikael model in beech/white and was $69.99. It is approximately 55inches wide, 29inches deep and 29inches high. The filing cabinets were fromZellers, on sale for $39.99 each (I got 2) and are for standard, letter sized documents. The black storage boxes were also from Ikea and were the Kassett series, both the CD boxes and Magazine boxes. They came in sets of 2 per kind and were $6.99-$17.99. The parts drawers and storage drawers on my work desk are from Canadian Tire and ranged from $13.99-$29.99 at regular price, but I waited until they were on super-sale. The workbench (still to come) is a stainless steel-topped workbench from Canadian Tire and is regularly $199.99 but I got it on sale for $89.99. The total office overhaul (7 years overdue), cost about $550. Prices are in Canadian Dollars, not including taxes.

Have a great day, I am off to enjoy my nearly finished, and SO much better, art space!

Monday, October 26, 2009

Monday's Methods: Time to Get Wired!

Left Back: Plastic Coated Practice Wires, Right back: Copper Wires, Left front: Gold Filled Wires, Right Front: Sterling Silver Wires.

In this installment of Monday's Methods, we'll be talking about wire. Wire comes in many forms, colors and types, but we'll be dealing with pretty standard fare here.
First, wire comes in different shapes (when looking at it from a cross-section). You can get round (like a circle), half-round (like a half circle), or square (obvious). You can get it straight or twisted to give it a diamond-like look. Here we'll be dealing with round wire for several reasons:
1. I find it useful for almost every type of wire working,
2. It is usually the least expensive, especially compared to square,
3. It is the most easily available, from bead suppliers to wholesalers, to tiny country bead shops, you can find round wire pretty much everywhere.
Different Wire Gauges, From top: 18 ga., 20ga., 22ga., 24ga. (copper), 26ga., 28ga. (gold filled)

You can also get wires in different hardnesses: full-hard, half-hard and dead-soft. For most wire working, full-hard is pretty much useless - any more than one bend and it snaps. Half hard is the wire I use most, as it is flexible and bendy, but will hold its shape. It doesn't snap easily (unless you REALLY bend it back and forth in the same place for a while), and, again, is the most readily available wire. Dead-soft is very useful for intensive wire wrapping applications and I really only use it for that, as it bends like butter on a hot day.
Wire comes in different gauges (ga. for short). For beginners, I recommend getting wire in sizes 18, 20, 22, and either 24, or 26. I use a range from 12 gauge, all the way to 28 in almost all of my wires: practice, sterling, copper and 14karat gold filled. I also have a range of sizes in non tarnish silver plate wire for making things like key chains and zipper pulls.
But wait, what kind of wire should you get first? When first starting out, or when trying new designs, go for the 'practice wire'. Just about every supplier will carry what they call practice wire. It will usually be copper core (or nickel, so be careful when wearing it or giving it to potentially allergic people), and will usually have a colored plastic coating. These are the least expensive, and usually are somewhere between the half-hard and dead-soft range in hardness. Plus, they are CHEAP. You can often buy a few spools of practice wire for the same price as one spool of sterling silver wire. Once you are comfortable with the practice wire, move on the the copper and plated wires, and then up to the sterling silver and 14karat gold filled wire (don't use pure gold wire for wire work, as it is WAY too bendy...plus it is about $8 per INCH).
Wire in a Bag: Always Use Resealable Bags with Anti Tarnish Paper for Uncoated Metal Wires

Of course, as you move up the quality scale, you'll be moving up the price scale as well. When shopping for precious metal wires, search out the best deal. Many stores will have quantity discounts (for when you know you really want to do this more than just once). Most precious metal wire is sold by the Troy Ounce. Some sell it by the half Troy Ounce (usually for gold filled as it is so expensive). Look around, and you'll see some astonishing differences in price. Just keep in mind, there may be shipping on top of that price as well so I always try to find the best shipping rates as well, especially if they don't have free shipping with minimum order amounts.
Organized and Tarnish Free: Stackable, Clear, Resealable Containers Are the Best Way to Store Your Wires

Once you have brought your wire home, you need to think about how to store it. Some stores give you a piece of wire and send you on your way (I HATE that, and try not to buy from them if I can avoid it). Some stores give you wire all coiled up in a resealable bag (the most common). And some will give you your wire on a spool (the most efficient and practical), which is then put in a resealable bag. Regardless of how I get my wire, I always put it in a resealable bag with a small piece of anti tarnish paper. You only need about a 1/4" square per bag to keep everything nice and shiny. You don't need it with coated wires, obviously, and you may not need it with gold wire, but hey, I paid good money for this stuff, I want it looking perfect for as long as I can possibly have it looking that way! It may seem expensive when you first buy it, but anti tarnish paper is going to save you hours of elbow grease, trying to get stubborn tarnish off of your wires.
Once I've got the wire in its own bag, I label it with the size, supplier, and price per foot and then put it in a resealable container with other wire of its kind (sterling with sterling, gold with gold, etc) so that every thing is organized and ready to go. I usually use containers that have been taken of kitchen duty due to a small crack or other nuisance and patch them up with clear duct tape to keep them airtight. Reduce, reuse, recycle, and my wires are all organized!

I hope you have found this useful, until next week, happy experimenting!

Tune in tomorrow for a great Tuesday's Treasures.

Monday, October 19, 2009

Monday's Methods: A Few More Tools of the Trade

On this installment of Monday's Methods, we're going to look at the rest of the tools I use most frequently in my jewelry making. The first photo is of a hammer and anvil. These are VERY useful in my jewelry making! When wanting to flatten, harden, or just plain "texturize" my work, these two tools come in very handy. Now let me be clear here: these are NOT "jewelry maker" anvil and hammer - I got them at (*GASP*) my hardware store! You can too, you just need to have a few goals in mind:
1. the anvil needs to be clean and flat - mine came with a layer of grease to protect it from rust, so I had a heck of a job cleaning it to get it ready. I still need to polish the metals after I hammer them on it, but as a plus, it is large (the flat area is about 5"x2-1/2" and the round area is about 4 inches, tapering down from wide to narrow), it is heavy (10 pounds) and it only cost me $10 (as opposed to $25-$30 for one 1/4 the size that says "for jewelry making" on the box)! I do recommend putting a flat cloth or heavy cardboard under it when hammering so that you don't mark the surface the anvil rests on.
2. Your hammer should be comfortable to hold and clean and flat on the hammering end. You can use a ball-paean hammer with a rounded hammering surface, but you'll get pock marks on your metals. While this can be useful for some applications, in general, you want it flat and even and clean of scratches and dents that come from hammering nails into things. I hunted for a while at the hardware store to find this one on sale for $5! It isn't too big and heavy, which means that for really flat wire I have to hammer more, but it also means that I can do more delicate hammering with a lighter touch and don't have to worry about a giant hammer coming down on a tiny piece of metal.
Now, certainly, if you have the money and want to get the jewelry making-specific tools, go ahead, but I have found these to be perfectly workable and VERY affordable - score!
Here we have a vise. This is great when you have finicky projects that require more than 2 hands. I don't know about you, but I only have 2 and when they are full, I can't do much of anything else but deal with what is currently in my hands. I now make my braided wire bracelets on this and I can't tell you how much easier it is to braid 9 strands of wire with a vise holding them together, than with just my own two hands. I found this one at my hardware store for $15, and again, I had to clean it, but it is great. I should also mention that the actual vise part that grips the metal has a bumpy surface, which is not at all desirable as it can really mar the jewelry. The solution: I simply put a small piece of plastic or folded up paper on the insides to protect my wire and voila! No more marks on my wire!
Here are some really dead-useful items. The small ring on the left is actually a jump ring opener and is incredibly handy when opening large numbers of jump rings (little rings for connecting jewelry pieces, or making chain mail). You simply slip this on whatever finger it fits on, slide part of the ring into the slot that fits the ring (there are different sized slots for different sized rings on this one), twist the jump ring slightly, and there you have it; the jump ring is opened properly and took less than a second!
The red handled items are step mandrels. These are useful for creating rings, or even just bends and curls in wire. What is great about these is that they are stepped- meaning each one starts out wide at the handle, and then reduces in measured increments (like steps) to another, smaller increment. These go from (on the left) 1.5mm to 5mm in 5 steps, to (on the right) 6 mm to 10 mm in 5 steps.
The next 2 items are ring mandrels. The first is a heavy, mountable, metal mandrel that is suitable for hammering on. It has all the rings sizes engraved on it so you can see the size of the ring you are making, and it is great for measuring finished rings on as well. The furthest right is a plastic mandrel, used for measuring rings with stones. It has the ring sizes engraved on the side not shown, but what is neat about this one is that it has a channel in it (shown) to measure rings with large stones. This is NOT made to be hammered on as it is breakable.
Finally we have plastic ring sizers which are (obviously) used to measure your fingers to see what size you are. Interesting to note is that these are not always 100% accurate: they are accurate if the ring band is the same width as the sizers, but rings with wide bands may actually need to be upped by 1/4 or even 1/2 of a ring size to accommodate for the width having to fit over knuckles. Just keep in mind that these are always approximate, though more accurate than not :-)
And last, but certainly not least is a jig. This is a most wonderful tool as you can make patterns in wire, as well as useful findings like ear wires. This one is a WigJig (tm) and is made of clear airplane window-grade acrylic. It is see-through, unlike most jigs, which means that if you draw a pattern, you can place it under the jig and see the pattern while you follow it with your wire. Also useful are the many different sized pegs that are sold separately, to give you different sized circles with your wire. This brand of jig is slightly more expensive than the non clear metal ones, but I really find it worth the price. Besides, I saved enough on the vise, anvil and hammer to pay for this jig!

That is all for today, tune in tomorrow for an update on the bracelet I'm (still) making!

Happy creating,

Tuesday, September 29, 2009

Tuesday's Treasures: Cleopatra's Bangle Progress

Here is the (very Slow) progress I have made on the new bracelet. I keep getting distracted by fall cleaning, doctor's appointments and other things and have to keep putting it down. The good news is that my doctor told me I have acid reflux and not throat cancer (I'd been having a feeling of my throat closing for months so this is a HUGE relief), we got 3 new 2-drawer filing cabinets and FINALLY bought new sofas (on sale, to replace the 18 year old ones that practically sink to the floor!). The bad news is that, or course, my jewelry making has been suffering abysmally.

The base of this bangle is made with right angle weave, which I will be going over afterward in all manner of patterns to build it into a 3-dimensional bangle that feels soft as silk, yet is actually quite hefty. This bracelet uses about 50-60 grams of seed beads, each individually sewn into place with many, many yards of beading thread. This will end up containing AT LEAST 3000 beads!! Yes, I do doubt my sanity at times when doing this, but I must say, with a good TV show or movie on, a good cup of tea and a comfy seat, the time flies and I relax so much it is amazing. I will be covering right angle weave in one of my Method Mondays in the future, if you were wondering what that was :)
Here is the up close - I'm sorry for the bad photos: I took them in my living room window this morning, but as we are still fairly dark at 7AM now, the lighting wasn't so great. It really doesn't show how nice a blue these beads are - sort of an oily, lapis lazuli shade. I'll try to keep you up to date on the progress, and hopefully it won't look so pathetic next time!

Have a great day, tune in tomorrow for another installment of Arwendnesdays with Arwen the Wonder Dog.

Monday, September 28, 2009

Monday's Methods:Jewelry Making Basics

~Bent Chain Nose Pliers, Round Nose Pliers (Ergonomic), Flush Side Cutters~

For the first installment of Monday's Methods, we are going back to the basics: The very foundation, the tools of the trade as it were. This is a very BASIC list of tools (and you can be sure that I'll be adding to this list as we go on) that you can get at any jewelry supplier or bead store to start your own beading adventures! The biggest thing to keep in mind at any stage is to get the best you can afford. Never, ever get the cheapest pliers ($5 and under here in Canada, probably less in USA and abroad). They are uncomfortable (read: bruises and blisters), they don't have good construction, and they won't really last. A good starting point is about $10. From there, you can move up to more expensive ones (I am coveting a set of German ones, at about $40 per pair....it'll be awhile!), or resell them to a beading friend at a reasonable price if you don't think jewelry making is for you. A quick note: DO NOT use regular needle nose pliers that you would get at the hardware store. With very few exceptions, these all have ridges on the inside of them which will seriously mar your wire.

The first photo shows three sets of pliers: Bent Chain Nose Pliers, Round Nose Pliers (Ergonomic), and Flush Side Cutters.

Bent chain nose pliers are great for wire working when you need a bit of an angle on things. They are great for helping you get into tiny areas. If you look closely, or at the second photo, you'll see that mine taper to a fairly fine point. This is, again, to get into those tight spaces. The angle looks awkward, and feels awkward, at first, but after a little while working with these babies, you won't EVER want to go to back to straight chain nose pliers. When I teach classes, I always get my students to grab the bent chain nose over the straight. Try them and you'll see why!
~Tapered Bent Chain Nose Pliers~

Round Nose pliers are great for making wrapped loops, bends in wire, and so much more. They aren't as good for holding wire as the chain nose pliers, as the rounded sides may mar the wire if you press down too hard. Mine have more ergonomic handles which reduce stress and fatigue on your hands - always a plus if you are doing many hours at a time, or if you have arthritis.

Flush side cutters are great for cutting wire flat. You position the cutters perpendicular to the wire and it will cut at a ninety-degree angle, reducing the amount of filing time. They are a little more expensive than regular cutters, but worth it. A side note: do NOT cut thick wire or memory wire with these, as it will nick the blades. These are for regular wire only. I cut 18 gauge or less, though usually for 18 gauge, I'll use my big cutters, just to be safe.
~Nylon Jaw Pliers, Crimp Pliers, Heavy Duty Cutters~

The next photo shows Nylon Jaw Pliers, Crimp Pliers, and Heavy Duty Cutters. Though not strictly essential, they REALLY help move things along.

Nylon Jaw pliers are great for straightening curled wire, and work hardening wire (we'll get to that last technique another day). They are also great for holding soft wire without making dents in the wire. You can even make small pieces of wire decoration (swirls, etc) and then hold and press them in the pliers to make them more sturdy (again, we'll get to that another day).

Crimp pliers are a wonderful invention for using the very finicky crimp beads. They help to make crimping and flattening the crimp beads as simple and painless as possible (this is again, for another lesson).

Heavy duty cutters are just that: cutters for cutting heavier gauges of wire, or memory wire. These are actually taken from a regular old hardware store set of pliers. They are inexpensive and effective. You can, of course, get the fancy heavy duty ones from bead stores, for a little more expense.
~Right Angle Bent Chain Nose Pliers, File, Tape Measure/Ruler~

Here is another set of bent chain nose pliers, a metal file and tape measure.

This, second pair of bent chain nose pliers, is less expensive (they were actually my first pair that I have retired to second duty, as their joint is starting to wiggle) and are used when two pairs of flat pliers are needed (usually in finicky wire work). If you look at the fifth photo, you'll see that these pliers have a near ninety degree bend and don't taper quite as much at the end as the other pair - there are many types and styles of pliers, so if at first you don't find a favorite, keep trying and you're sure to find some that you like.
~Ninety Degree Bent Chain Nose Pliers~

The file is an essential piece of equipment in my opinion - you don't have to buy expensive metal ones either, as a simple nail file will suffice for all but the most rare of projects. Use this to file the ends of your wires to prevent snags on clothing, or for filing the ends of ear wires to prevent them being uncomfortable when inserting them into ears.

The tape measure, or a ruler, is imperative. If you want to produce accurate replicas of your work (for ear wires, or other more particular pieces), you must be able to accurately measure your wire or other materials. I have both a rigid 6 and 12 inch ruler, as well as a standard fabric tape measure. They are all worth the money you'll save in wasted, improperly measured wire later on!
The second, forth and fifth (above) photos show how to correctly hold your pliers. You want to cradle your pliers in the natural depression of your hands (above). Gently curl your fingers around the pliers as you'll see in photos 2 and four, and you'll have your grip. Here is where trying a few different sizes and types of pliers will come in handy - my hands are long and so the "mini" or smaller type pliers are out for me, unless I want to induce fatigue on my hands. Also, pay attention to the handles - the smaller or narrower they are, the quicker they will hurt or fatigue your hands if you are doing anything remotely finicky.

That is all for today, I'm sorry this was a bit late - our internet kept dropping and then I had a doctor's appointment. Tune in tomorrow for a bit of the project I'm working on now.

See you tomorrow!

Thursday, September 24, 2009

Thoughtful Thursday: Planning Ahead

Hello everyone! I, Arwen the Wonder Dog, have taken over the blog again today to help with a serious issue here. Before I do, we wanted to thank everyone for all of their comments on our blogs - we might not answer them all, but we read and love every one of your wonderful comments!

Now, back to business! A little while ago, mommy asked you all how she could improve the blog and her store to keep you interested and coming back. Many of you wanted to see more of me (but of course!), and many of you also wanted to see how Meghann, my mom does what she does - how she makes her fabulous jewelry pieces, what she uses, et cetera. If truth be told, mommy is a little shy so she asked me to help her plan some lessons. The top photo is me looking apprehensive - I stated previously that holding pens in my paws is difficult, but I thought I should give it a try...
Well, OK, I'll write, but I don't want you to see it until it's done!

OK, I can't be that mean, but here are a few of our thoughts so far:
-Jewelry how-to's will be done on Mondays and will be called "Monday's Methods"
-We'll cover the basics; tools, how they are held properly, what they are used for
-Different wire types and how they are used
-Different Bead and stone types, their differences, why it's important, and how they are used
-Techniques; basics, wrapping, hammering, stitching
-Works in Progress
...And much more!

We are also working on trying to clean and organize mommy's office. It is hard because she doesn't really have a good working space, but we are working on that too!

Please let us know if there is anything else you would like to see so that we can make sure you are always happy visiting us. We want to make you happy and keep you interested!

Ta-Ta for now,
and Arwen

Tuesday, September 1, 2009

Tuesday's Treasures: New PhotoAccessories!

Well, here they are, my new photo accessories! I got a mini tripod (I won't tell you what Brennan said it looks like - it was rude!), a remote for my camera so I can take photos of my hands while I work, and a magnification filter for my lens. Now, I haven't figured out quite how the lens filter works best - my camera seems to have a hard time focusing when the filter is on, but I'll play around a bit and let you know how it goes. If I can't use it for jewelry, it isn't a big deal, I can still use it for flower and bug photography. I am so excited to show you my techniques and various other things now! Stay tuned, I'm working on some ideas for you.

The back to school sale is over, but keep checking back for more great sales, specials and jewelry goodness.

I will also be doing a charity of the month post very soon :)

Monday, April 27, 2009

Melodious Monday - New Jewelry Books, Oh My Gosh!


To research a new line of jewelry I am going to make (more on that to come, keep tuning in!), I decided to REALLY research jewelry of the past, and so I went on a wonderful search for books. Now, anyone who knows me knows that books are (aside from family and hubby) the MOST important things in my life. I love books more than just about anything! The search was amazing, and I decided to get 2 books (of the hundreds I would like, that is!) on jewelry throughout history.
These are the books I purchased: "7000 Years of Jewelry", edited by Hugh Tate (now deceased, unfortunately, as he really knew his stuff!), and I also purchased, "Masterpieces of Ancient Jewelry - Exquisite Objects from the Cradle of Civilization" by Judith Price. These are an amazing, well-researched starting point. Though I may need to get books on certain time periods if I want very detailed information, these books more than cover the basics, going back over 7000 years of jewelry throughout our various civilizations. Covering materials, processes, styles and trends, these books are an amazing read even if you aren't interested in making jewelry. The photographs are simply stunning and the authors really know what they are talking about.
What really amazes me is that the styles, materials and processes haven't changed all that much, we have simply refined them over the millenia with better technology and lighting. I cannot imagine being a Celtic goldsmith 2000 years ago, trying to melt gold during the slim 4 hours of good daylight in England, yet they did it, and created some of the most spectacular gold work!
More on my new collection soon, I can't wait to get started!

LinkWithin

Blog Widget by LinkWithin